Morph transition in PowerPoint is simple but very effective in adding life to your presentation. As the name suggests, it morphs one image into another. The morph transition has been designed to make your slides more lively and engaging by creating a smooth and seamless transition from one fall to another.
Free PowerPoint Presentation Template
This transition can be used in all kinds of presentations, including business presentations, product launches or sales pitches, training courses, etc. This is because it has been designed with a lot of care to ensure the perfect blend of simplicity and impact.
Use the Morph effect for quick animation
While the Morph transition is great for creating quick animations, you can also use it with other transitions, animations, and effects.
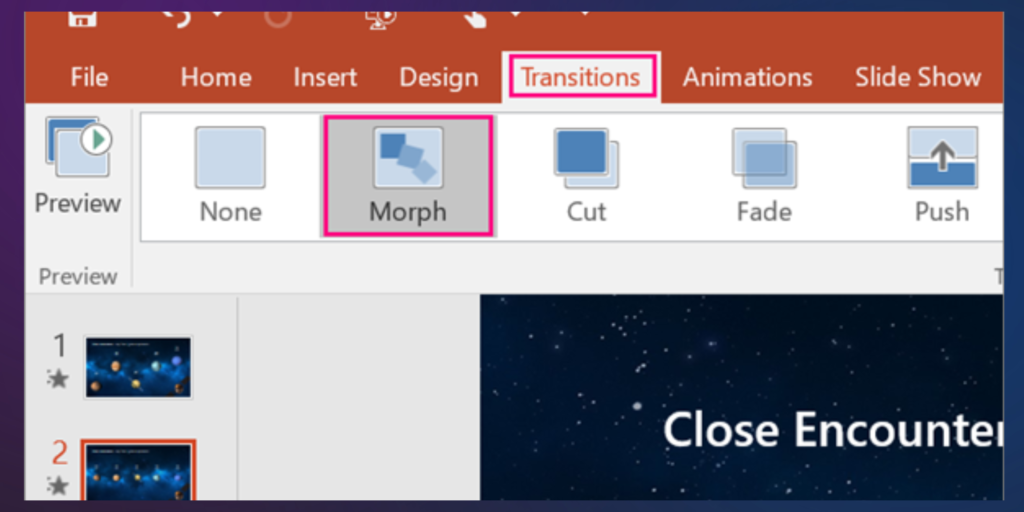
Morph transitions are easy to use: just click on the slide with a picture you want to animate and select Morph. You’ll then see an arrow in your toolbar that lets you choose which effect will be applied first (or second if you’re using two). Next click on the effect or animation that should follow and then just drag it into place as usual!
Add other animations to your Morph
If you want to add visual interest to your presentation, try using other animations. For example:
- If you’re transitioning from one slide to another, use a Morph animation in addition to the other transition.
- If you want to show a process or journey in your presentation, use a Morph animation on the slides that represent each step. Then use some other type of transition for slides that are part of the background information but not directly related to your main point.
- If there’s something else happening outside of the slide (for example, if there’s something happening on stage), use an animated graphic in place of text or images on those slides – this will help keep people focused on what’s important for them at that moment and let them know when it’s time for everyone else on stage/in front of their screen

Create images of different sizes
- Size and position tools
- Zoom tool
- Zoom to fill tool
- Zoom to the window tool
- Zoom to the full-screen tool (in Windows only)
The last three options are especially useful when you want to fit an image without losing the aspect ratio. The first three will stretch your images, which can result in some distortion or pixelation. To avoid that, use one of those last three options instead.
Use more than two shapes to morph
To create a more sophisticated effect, don’t limit yourself to just two shapes. For example, you can have one shape morph into another as it turns its corners:
- Use different shapes. You can also morph between more than one shape. For example, use the rectangle tool to generate an even number of pods (the number of pods should be equal to the total number of slides in your presentation). Then place these pods on each slide, and lock them so they remain unchanged during animation.
- Use different colors. You can also apply color variations when morphing from one object into another by assigning different colors for each step in your transition: for instance, starting with red (first step), then turning yellow (second step), green (third step), and finally blue-gray (fourth step).
- Use different fonts. Alternatively, you could apply typeface variations when morphing from one object into another by assigning different fonts for each stage of the transition, say Arial at first, Helvetica after that, Times New Roman after that, Bookman Old Style after that, and finally Century Schoolbook MT.
Add motions paths
You can create a motion path by selecting a shape and clicking the Edit Sketch Paths button on the Ribbon. This will show you a dialog box where you can add anchor points and curves to your shape. The anchor points are the beginning and end of the path, while each curve represents one point in time over which your object will travel on its journey from one anchor point to another.
It’s best to think about motion paths as being like storyboards for shapes; they help guide their movement through time and space. If you want to make sure that your shape changes over time, consider adding keyframes at specific intervals along your motion path that correspond with changes in velocity or acceleration (or both). For example, if you wanted an arrowhead-shaped graphic element in a PowerPoint slide click here
Use Morph with Word Art and text boxes
When you add a text box to your slide, you can use it to create word art. Click on the Text Box tab and then click on the WordArt button. You will see all kinds of shapes that can be used as words in the middle of your text box.
To make sure that there is enough space between each letter in your word art, select “Align Center” from the menu to center align all letters.
Delete extra points in a shape
If you want to delete extra points on a shape, you can do it in PowerPoint 2016.
How?Just follow these simple steps:
- Select the shape you wish to edit and then right-click on the desired point.
- Select Delete Point from the menu list that appears at your cursor’s position or press Ctrl+Del (delete). You can also use this method if you want to remove multiple points at once by holding down Ctrl while clicking on each point one after another while still holding down the Control key until all selected points have been removed from your graphics presentation slides as well as presentations!
Final words
These are just a handful of tips for using the Morph transition in PowerPoint, but there are many others. Some users have created entire presentations out of a single shape with multiple morph transitions connecting them. You can create incredibly complex animations that look very similar to videos in PowerPoint. If you get creative and use your imagination, your presentation will truly be unique: not only do you have control over what is shown, but how it’s shown through animation effects like this one!
Check out our website https://www.visualspiders.com/ to know more about our PowerPoint Presentation Services
Related Content: Improve Your Presentation with Motion Path Animation